Nothing Happens When I Use the Webgl Platform for Unity Upload
WebGL Browser Compatibility
WebGL: Deploying compressed builds
Building and running a WebGL project
When you build a WebGL project, Unity creates a folder with the following files:
-
An index.html file which browsers can navigate to load your content.
-
A TemplateData folder (when building with the default template) containing the build logo, loading bar and other template Assets. The build template folder is ordinarily used to customize the appearance of the build while loading. See the User Manual page on WebGL templates for more than data.
-
A Build folder containing your generated build output files.
The Build binder contains the following files (the MyProject file proper name represents the name of your project).
-
A UnityLoader.js JavaScript file containing the code needed to load upwards the Unity content in the spider web page.
-
A MyProject.json JSON file containing all the necessary information about your build. The URL of this JSON file is provided as an statement for the Unity Loader when the build is instantiated. JSON file contains URLs of all the other build files, which can be absolute or relative to the location of the JSON file. JSON may contain additional Module parameters, such every bit the splash screen style or the initial size of the memory heap.
-
A MyProject.asm.framework.unityweb file containing the asm.js runtime and JavaScript plugins.
-
A MyProject.asm.code.unityweb file containing the asm.js module for your histrion.
-
A MyProject.asm.memory.unityweb file containing a binary image to initialize the heap retention for your thespian.
-
A MyProject.data.unityweb file containing the Nugget data and Scenes.
The contents of the *.unityweb files in the Build folder may be compressed with gzip, brotli or may be uncompressed, depending on the Publishing Settings. See documentation on deploying compressed builds for more information
You can view your WebGL player directly in nigh browsers by opening the index.html file. Nonetheless, for security reasons, Chrome places restrictions on scripts opened from local file URLs, so this technique does not piece of work in Chrome. To piece of work round Chrome's restrictions, utilise Unity's Build & Run command ( File > Build & Run); the file is then temporarily hosted in a local web server and opened from a local host URL. Alternatively, you can run Chrome with the --allow-file-admission-from-files command line choice which allows information technology to load content from local file URLs. This is required on a PC to let execution of the build.
On some servers you need to explicitly make .unityweb files accessible, considering the server needs to provide these files to clients.
Build role player options
Access the WebGL options via the in the Build Settings dialog box. (menu: File > Build Settings…). In the dialog box, select WebGL from the Platform listing, then select Thespian Settings….
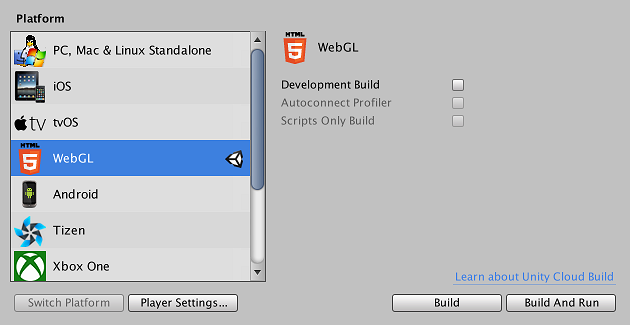
Development Build
When you check the Evolution Build checkbox, Unity generates a development build which has Profiler support and a development console to see errors. In addition, evolution builds do not compress content (that is, content is not minified); they maintain JavaScript in human-readable course, preserving part names and so y'all get useful stack traces for errors. Notation, however, that this means development builds are very large, and too big to distribute.
Use pre-congenital Engine
This option merely appears when you have the Development Build checkbox checked. Utilise the Apply pre-built Engine option in the Build Settings dialog box to speed up build iteration time during development. When this option is enabled, Unity rebuilds only the managed code and then links dynamically with the pre-build Unity engine, so the project is rebuilt approximately 30–40% faster. Note that this blazon of build is simply suited for development purposes, as it always produces unstripped engine lawmaking. Due to the dynamic linking overhead, the functioning of this type of build is slower than a normal build.
Autoconnect Profiler
This selection can simply exist enabled when yous take the Evolution Build checkbox checked. Check the Autoconnect Profiler option to profile your Unity WebGL content. For WebGL, it is not possible to connect the Profiler to a running build as on other platforms, and then yous have to use this option to connect the content to the Editor. This is considering the Profiler connexion is handled using WebSockets on WebGL, only a web browser only allows outgoing connections from the content.
Player Settings
WebGL has some additional options in the PlayerSettings Inspector window (card: Edit > Projection Settings > Player).
Other Settings
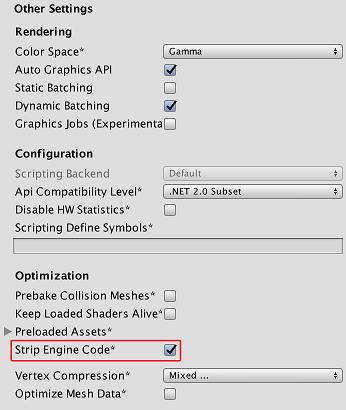
Strip Engine Lawmaking
Open up Other Settings to admission the Strip Engine Code pick. This selection is checked by default to enable code stripping for WebGL. With this option checked, Unity does not include code for any classes you lot don't apply. For instance, if you don't use any physics components or functions, the whole physics engine is removed from your build. Encounter the Stripping section below for more than details.
Publishing Settings
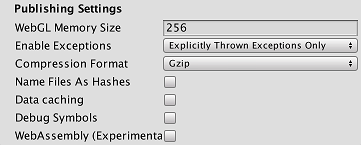
WebGL Memory Size
Open Publishing Settings to access the WebGL Memory Size field. Here, you tin specify how much retentivity (in MB) the content should classify for its heap. If this value is too depression, an "out of memory" error message appears. This ways your loaded content and Scenes cannot fit into the available retentivity. Nevertheless if this value too high, your content might fail to load in some browsers or on some machines, because the browser might non take enough available memory to allocate the requested heap size. This value is written to a property named TOTAL_MEMORY in the generated .json file, so if y'all desire to experiment with this setting without having to rebuild your projection, you can either edit the .json file or provide the updated TOTAL_MEMORY value every bit an additional WebGL instantiation parameter. Come across the User Manual page on WebGL memory usage for more details.
Enable Exceptions
Open Publishing Settings to access Enable Exceptions. Enable Exceptions allows you to specify how unexpected lawmaking behavior (generally considered errors) is handled at run fourth dimension. There are three options:
- None: Select this if you don't need whatsoever exception support. This gives the all-time performance and smallest builds. With this option, any exception thrown causes your content to stop with an error in that setting.
- Explicitly Thrown Exceptions Just (default): Select this to capture exceptions which are explicitly specified from a
throwstatement in your scripts. This option besides makesfinallyblocks in your scripts work. Note that selecting this selection makes the generated JavaScript code from your scripts bigger and slower, but, unless scripts are the main bottleneck in your projection, this is non probable to be a meaning issue. - Full: Select this choice to capture:
- Exceptions which are explicitly specified from a
throwstatement in your scripts - Aught References
- Out of Bounds Array accesses
- Managed Stack traces
- Exceptions which are explicitly specified from a
Unity generates these exceptions by embedding checks for them into the code, and then this pick increases the code size and slows down performance. Use this way only when you need to debug problems in your lawmaking, every bit information technology generates very large and very slow builds.
Select Publishing Settings to admission Information Caching. Select this to enable automatic local caching of your player information. This option sets asset storage as a local cached in the browser'south IndexedDB database, so that assets won't have to be downloaded again in subsequent runs of your content. Note that different browsers take unlike rules on assuasive IndexedDB storage; browsers may ask the user for permission to store the data, and your build may exceed a size limit divers by the browser.
Distribution size
When publishing for WebGL, it is important to go along your build size low and then users get reasonable download times before the content starts. For generic tips on reducing nugget sizes, see documentation on Reducing the file size of the build.
Hints and tips specific to WebGL
-
Specify the Crunch texture pinch format for all your compressed textures in the Texture Importer.
-
Don't deploy development builds; they are not compressed or minified, and then have much larger file sizes.
-
Become to PlayerSettings (menu: Edit > Projection Settings > Player), open Publishing Settings and set up Enable Exceptions to None if y'all don't demand exceptions in your build.
-
Go to PlayerSettings (menu: Edit > Project Settings > Thespian), open Other Settings and enable Strip Engine Code to ensure an efficient build.
-
Have care when using third-party managed dlls, as they might include a lot of dependencies and then significantly increase the generated lawmaking size.
If you make a release build, Unity compresses the build output files according to the Compression Format selected in the WebGL PlayerSettings > Publishing Settings window.
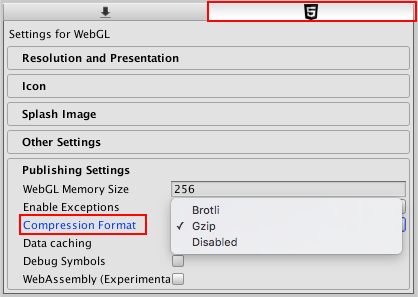
Run across documentation on Deploying compressed builds for more info on these options, and on how to publish builds with them.
AssetBundles
Since all your Asset data needs to exist pre-downloaded earlier your content starts, you should consider moving Assets out of your primary information files and into AssetBundles. That way, you tin create a modest loader Scene for your content which loads speedily. Information technology then dynamically loads Avails on-demand as the user proceeds through your content. AssetBundles likewise help with Asset data retention direction: You can unload Asset data from retentiveness for Assets you don't demand any more than past calling AssetBundle.Unload.
Some considerations apply when using AssetBundles on the WebGL platform:
-
When you lot use grade types in your AssetBundle which are not used in your main build, Unity may strip the code for those classes from the build. This tin cause a neglect when trying to load Assets from the AssetBundle. Use BuildPlayerOptions.assetBundleManifestPath to fix that, or run across the section on Stripping, beneath, for other options.
-
WebGL does not back up threading, but http downloads only become bachelor when they have finished downloading. Because of this, Unity WebGL builds need to decompress AssetBundle data on the master thread when the download is done, blocking the main thread. To avoid this suspension, LZMA AssetBundle compression is not available for AssetBundles on WebGL. AssetBundles are compressed using LZ4 instead, which is de-compressed very efficiently on-demand. If yous need smaller compression sizes than LZ4 delivers, y'all can configure your web server to utilise gzip or Brotli compression (on meridian of LZ4 compression) on your AssetBundles. See documentation on Deploying compressed builds for more information on how to exercise this.
-
AssetBundle caching using World wide web.LoadFromCacheOrDownload is supported in WebGL using the IndexedDB API from the browser to implement caching on the user's computer. Note that IndexedDB may accept express support on some browsers, and that browsers may request the user's authorization to store data on disk. See documentation on WebGL browser compatibility for more data.
Stripping
Unity removes all unused code from your build by default. You tin can change this via the PlayerSettings Inspector window (carte: Edit > Project Settings > Histrion): Select Other Settings to access the Strip Engine Lawmaking option. Information technology is better to build with stripping enabled.
With code stripping, Unity scans your project for any UnityObject-derived classes used (either past being referenced in your script code, or in the serialized data in your Scenes). It and so removes from the build whatsoever Unity subsystems which have none of their classes used. This makes your build have less code, resulting in both smaller downloads and less code to parse (so code runs faster and uses less memory).
Issues with lawmaking stripping
Code stripping might cause issues with your project if it strips code which is actually necessary. This can be the example when you load AssetBundles at run fourth dimension which contain classes that are not included in the chief build, and have therefore been stripped from the projection. Error messages appear in your browser'due south JavaScript console when this happens (maybe followed by more than errors). For example:
Could non produce class with ID XXX
To troubleshoot these errors, look up the ID (such as XXX in the example above) in the Course ID Reference to run into which class it is trying to create an example of. In such cases, you can force Unity to include the code for that class in the build, either by adding a reference to that form to your scripts or to your Scenes, or past adding a link.xml file to your projection.
Below is an example which makes certain that the Collider class (and therefore the Physics module) gets preserved in a projection. Add this XML lawmaking to a file chosen link.xml, and put that file into your Assets folder.
<linker> <assembly fullname="UnityEngine"> <blazon fullname="UnityEngine.Collider" preserve="all"/> </associates> </linker> If you lot suspect that stripping is causing issues with your build, yous tin can also try disabling the Strip Engine Code option during testing.
Unity does not provide a convenient style to run into which modules and classes are included in a build, which would allow yous to optimize your project to strip well. Still, to go an overview of included classes and modules, you can look at the generated file Temp/StagingArea/Information/il2cppOutput/UnityClassRegistration.cpp after making a build.
Note that the Strip Engine Code option merely affects Unity engine lawmaking. IL2CPP always strips byte code from your managed dlls and scripts. This tin cause problems when you need to reference managed types dynamically through reflection rather than through static references in your lawmaking. If you need to access types through reflection, yous may also need to fix a link.xml file to preserve those types. Come across the documentation folio on iOS Build size optimization for more information on link.xml files.
Moving build output files
To change the location of your Build binder, modify the URL of the JSON file (the 2d argument of the UnityLoader.instantiate) in the index.html file.
To change the location of the files inside the Build folder, change their URLs (that is, dataUrl, asmCodeUrl, asmMemoryUrl, and asmFrameworkUrl) in the JSON file. All not-absolute URLs in the JSON file are treated as URLs relative to the location of the JSON file. You tin specify URLs on external servers for these if you want to host your files on a content distribution network (CDN), merely y'all need to make sure that the hosting server has enabled Cross Origin Resource Sharing (CORS) for this to work. Meet the manual page on WebGL networking for more information about CORS.
Incremental builds
The C++ code generated for your project by IL2CPP is compiled incrementally; that is, only generated C++ lawmaking that has changed since the concluding build is compiled over again. Unchanged source code re-uses the same object files generated for the previous build. The object files used for incremental C++ builds are stored in the Library/il2cpp_cache directory in your Unity project.
To perform a clean, from-scratch build of the generated C++ code which doesn't apply incremental compiling, delete the Library/il2cpp_cache directory in your Unity project. Note that if the Unity Editor version differs from the one used for the previous WebGL build, Unity does a make clean, from-scratch build automatically.
• 2017–05–sixteen Page amended with no editorial review - Leave folio feedback
WebGL Browser Compatibility
WebGL: Deploying compressed builds
Source: https://docs.unity3d.com/560/Documentation/Manual/webgl-building.html
Post a Comment for "Nothing Happens When I Use the Webgl Platform for Unity Upload"